Showing posts with label dessert. Show all posts

My Paris: L'Eclair De Genie


It was a long time coming
before I could make it 
to the famous L'Eclair de Genie...

Well, in retrospect to my entire life, I suppose.

Once we got to Paris,
we were there within 72 hours.

Since then, 
we've been back, well....
more times than I'd like to admit.


I love these pretty little things...
and dream in the Vanille et Noix de Pecan.

It's, by far, the best eclair I've ever tasted.

And, hey, when you're in France,
that's exactly what you want to have.


Flavors rotate out seasonally,
but there are typically some classics that stick.

Don't go for a cheap treat,
as they are around €5 a piece for a gorgeous-yet-small eclair.

Go for a taste of something truly special
or a treat for someone that you really fancy.


It also makes a great dessert
after a falafel from it's lovely neighbor,
L'As du Falafel.


*   *   *


For more of my Paris recommendations, check here.


*photography by Noah Darnell

The Lovely Drawer: Gingerbread Blondies


I love brownies like every other person,
but a blondie has certain mystical appeal to me.

I'm not sure why, 
but if I have the choice-
I almost always will defect from the chocolatey hero
and cling starry-eyed to it's paler counterpart.

You can imagine my wonderment 
when Teri whipped up these 
gingerbread blondies
in her kitchen
for this month's recipe.

Gingerbread yumminess
combined with a blondie
drizzled with white chocolate?

My mind was as blown 
as the first time I encountered
which my sister hilariously refers to as
"the Tur-Duck-En of desserts."

It's just one of those creations
you encounter that has 
so much goodness 
wrapped up in one tiny thing.

It's like, as the Brits say,
all my Christmases have come at once.

Here's Teri to walk you through
this lovely creation.

(Don't forget to read it to yourself
in a sweet English accent... it makes it so much better.)


*    *    *


These yummies may look like brownies but they are in fact gingerbread blondies and each gooey bite is worth every calorie. These are really straightforward to whip up and make a nice change to a standard brownie. They work well as a dessert with some vanilla ice cream or as an afternoon treat with a cup of tea or coffee, yum!


225g dark brown soft sugar
150g butter
4 tbsp black treacle
2 tsp ground ginger
2 eggs
2 tsp vanilla extract
125g plain flour
125g wholemeal flour
1 tsp baking powder
1/4 tsp bicarbonate of soda
1 tsp salt
100g gingernut biscuits
150g white chocolate


METHOD:

1. Preheat the oven to 180 and line or grease a 20x 20 baking tin.

2. Mash the dark brown soft sugar, butter and treacle together in a bowl with a spoon until the mixture is totally combined. Mix in the ginger, eggs and vanilla extract.

3. In a separate bowl, combine the plain flour, wholemeal flour, baking flour, baking powder, bicarbonate of soda and salt. Add the flour gradually, incorporating between each addition.


4. Break the gingernut biscuits and 100g of the white chocolate into small chunks and stir into the blondie mixture.

5. Pour the mixture into the prepared tin and bake in the oven for 25 minutes. Leave to cool. 

6. Melt the remaining white chocolate in a heatproof bowl over a simmering saucepan of water, stirring constantly.

7. Pour the chocolate into a bottle with a small nozzle or wrap a sheet of greaseproof paper into a cone shape and snip the end off to drizzle the white chocolate over the blondies. Leave the chocolate to set a little and then cut into squares.


*    *    *


Yum.

Teri is off to Brussels for a week,
and I'm hoping the sticky and sugar waffles 
provide some inspiration for her next recipe!

Check out her (amazing) blog,


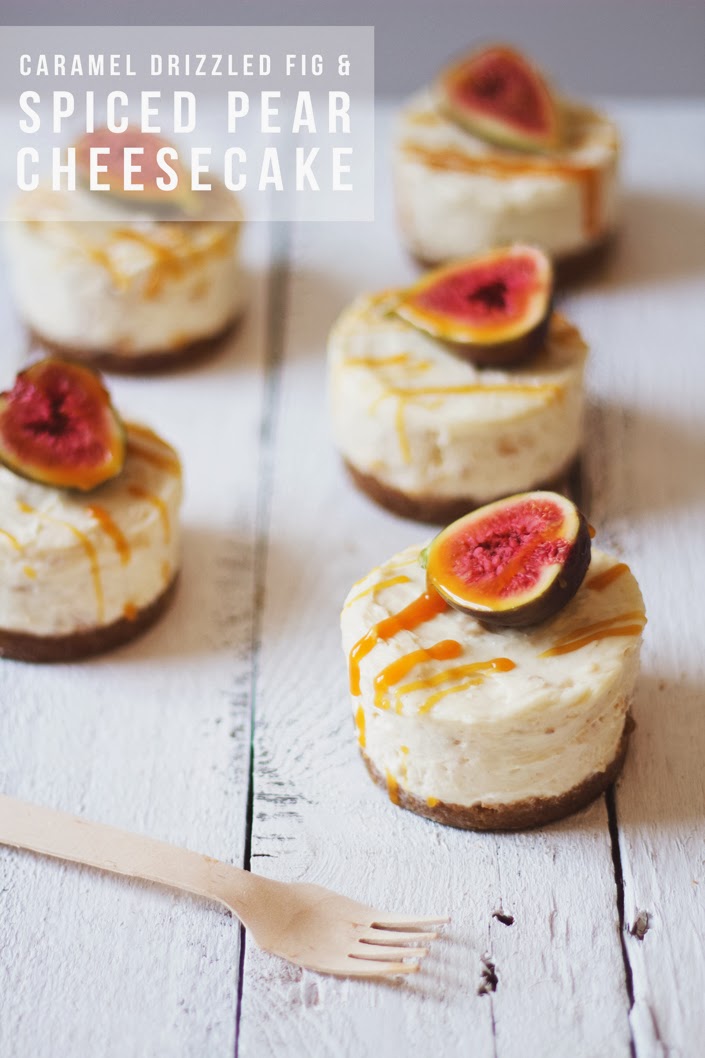
The Lovely Drawer: Spiced Pear Cheesecakes


So the holidays are over.

Womp. Womp.

Unless you are planning (re: neglecting) your Christmas tree
until it's a dry skeleton of what it once was
and hanging Valentines Day cards from it
like we run a high risk of doing...

January is a bit of dry spell of celebrating.

So... 
here's a little party you can throw for yourself:

these cheesecakes.

We went to dinner at Teri & Nick's the other week
and she made these for us as "pudding" (re: dessert).

With it's pretty figs setting on top for decoration,
I jokingly referred to is as a Figgy Pudding...
and I, of course, also flipped out
because it was delicious.

* * *


Any cheesecakes is usually a winner but I have to say I spend a lot more time making baked cheesecakes than set ones. In my head I'd somehow resolved that they were far superior. But then again the appeal of a dessert that doesn't actually even need cooking is quite tempting, especially when it involves mascarpone! 


I adapted this cheesecake recipe to form a spiced, winter version which would almost be warming...if it was so...chilled. I used a 3x1.75 inch mini cheesecake pan with removable bases. You could even smaller versions and make more or use 9 inch springform/ loose-bottomed tin for a standard cheesecake. My tin equated to 7 mini cheesecakes. Mini desserts are my fave! 


Cheesecake

1 C crumbled spiced biscuits, like Lotus (read: Speculoos) biscuits or similar.
1 oz walnuts 5 tablespoons unsalted butter2 pearsfigs for decoration2 tsp cinnamon 1/2 tsp nutmegtbsp firmly packed brown sugar14 oz full-fat cream cheese, at room temperature11 oz mascarpone, at room temperature3/4 C icing sugar, sifted1 tsp vanilla extract2 1/4 C water


1. Put the biscuits and walnuts in a bag and crush with a rolling pin until fine or blend in a food processor. Add 1 tsp of the cinnamon.

2. Melt the butter in a saucepan and then take off the heat stir in the biscuit and nut mix.


3. Press the mixture into each mini cheesecake tin. Compact well with your fingers or the bottom of a spoon and leave in the fridge while you prepare the rest. 

4. Peel and cut the pears into small chunks. Heat the water in a saucepan and add the sugar and the other tsp of cinnamon. Stir in and allow to dissolve. Add the pears and cook covered for about 15 mins. Allow to cool.

5. Combine the cream cheese and mascarpone in a mixing bowl and use handheld electric mixer to blend the cheeses together until light and fluffy.

6. Add the icing sugar a little at a time to incorporate and then add the vanilla to the mixture.

7. Make sure the pear mixture is cool and then squeeze the excess liquid out, gently through a sieve. Stir into the cheese mixture.

8. Spread this over your biscuit bases. Fill each mini tin and smooth over the top with a knife or spatula. 

9.Chill in the fridge for at least a few hours, ideally over night. The cheesecake firms up best when you remover them from their tins a few hours before serving and leave them in the fridge until you are ready to eat. Cut your figs into quarters and place on the top of each cheesecake.


Caramel sauce1 1/4 C powdered sugar
5 ounces double cream (or heavy whipping cream)
3.5 tablespoons butter


1. Transfer the sugar into a heavy based frying pan, stir in 4tbsp water and then place over a medium heat until the sugar is dissolved.
2. Turn up the heat and bubble for 4-5 mins until it forms caramel.
3. Remove from the heat and carefully stir in the cream and butter. Leave the sauce to cool and then transfer into a squeezy bottle.
4. Drizzle over your cheesecakes.


* * *


So, there you have it.

2014 just got a lot more awesome.


Check out more of Teri's cool creations
on her prettier-than-mine blog, The Lovely Drawer.


*all images original to Aspiring Kennedy

English vs American: Mince Pies


My grandpa used to love mince meat pies.

(mince meat pies = disgusting concoction having actual meat in it)

I used to gag seeing it.

To this day, I have absolutely no clue
what it was he was actually eating.

He passed away a few years before we moved to England,
or I was totally ask him to explain it to me.

And then I'd probably give him a really hard time about it
and he would laugh until his dentures would start to slide out of place. 

So cute.

Then we moved to England.

Our first Christmas, 
I politely passed at their tiny pastries
that were frequently offered
and internally judged their affinity
towards meat-laced pies.

The second year we were here, 
I started to suspect I was missing something.

So one brave day, 
I bought a pretty one
covered with a simply shortcrust start
and dusted with powdered sugar
and... well, I loved it.

Especially since
THERE WAS NO MEAT IN IT.

What?
What is a mincemeat pie then?

Check out my friend, Will, of Bright.Bazaar's great tutorial here.


The best way that I can explain it is
that it is like an apple pie...
without any apple.

Not all are amazing,
but you can score some really tasty ones
during the Christmas season in England.

So there.

Now you're a little smarter
and a bit more prepared
to not miss out on this delicious holiday treat.

* * *

Do mince pies make your holiday line up?
Or do you pass on for peppermint bark?


*image


The Lovely Drawer: Peach & Lavender Cobbler


Before moving to Oxford,
my job in Dallas was selling paper.

Really nice, fancy letterpress paper.

We had pretty books of invitations 
to lavish weddings & bar mitzvahs 
that stores could use to show their customers
what our work looked like
and what options they had to customize these 
to make them perfect for this event.

In the back of the book,
clients could sift through envelope liner options,
row after row of different typefaces,
and of course- ink colors!

We had all of our ink colors 
lined up and, there, where the soft purple sat,
was a small swatch labeled "lavendar."

"Lavendar," in case you aren't familiar,
is a mispelling of the gorgeous provencal flower, "lavender."

I still cringe thinking about that typo...
and the return address that was from "Greenwitch, Connecticut."

My spelling & grammar needs had to eventually deal with it
and wait for the book to be corrected at the next reprinting...

but fortunately,
I can eat one of these YUMMY peach & lavender cobblers immediately.

Welcome back, Teri of The Lovely Drawer
(and my in-real-life friend)
for her monthly recipe of British goodness. 

We are always glad to have you here at AK!

*    *   *


Hello again and here is something sweet and yummy to get your taste buds excited. 

I always use this cobbler topping recipe as it's definitely my favourite. 
Perhaps it's the buttermilk that makes it taste so delicious and cakey! 

You may notice in this recipe the topping serves 6. 
Call me greedy but I like a generous hat on my fruit and so I've used it for 4. 

I decided to try making a peach version but adding a twist to the flavour.

 Enter lavender.

 I wasn't entirely sure these two flavours would go together
 but it was definitely worth the risk.

 You can use tinned or fresh peaches.
 I'm of the opinion that peaches are one of the few foods
 that are totally acceptable from a tin so go for it!


Peach & Lavender Cobbler

Here's what you'll need:
For the topping...
140g plain flour
2 tsp baking powder
25g butter
25g caster sugar
150ml buttermilk
1 tbsp demerara sugar
A sprinkling of cinnamon 

For the filling:
2 410g cans of tinned peaches (sieved) or 800g fresh (stoned and cut into slices if fresh)
25g caster sugar
1 tbsp of honey
1 tsp dried lavender (de-stemmed)


Serves 4. 
Preheat the oven to 190C/170C fan/gas 5. 


1) Firstly simmer the peaches in a pan with 25g of the caster sugar, the honey and the lavender for about 5 mins, until all the ingredients combine. Set aside to cool.

2) Then sift the flour, baking powder and a pinch of salt into a mixing bowl.

3) Then rub in the butter with your fingers until it resembles breadcrumbs and stir in the caster sugar.

4) Mix in the buttermilk to give a soft, sticky mixture.


5) Spoon the cooled peaches into the 4 ramekins, distributing evenly and then spoon on the cobbler. 

6) Sprinkle with demerara sugar and cinnamon and cook for 25 mins or until golden brown.

7) Serve warm with a scoop of  ice-cream and a sprinkle of icing sugar on each.


 *   *   *

So... who's having me over tonight
so that I can eat some of this gorgeous, yummy goodness?

Any takers? :)


*images original to Aspiring Kennedy

The Prince Bonaparte Rules the World


At times, 
I can be slightly dramatic.

I've neem known to mae some fairly bold claims in my day.

I can't help it. 

I feel the moment. 

And last night,
I was really feeling it
when we were at 
the posh neighborhood pub,
and trying their sticky toffee pudding.

Listen to me, friends:
I eat a lot of dessert... a lot.

After countless bowls of this national treat,
I can confidently say:

This sticky toffee pudding is the best I have had.

While Napolean never achieved his dreams 
of world dominance,
The Prince Bonaparte has dominated all others
in this special recipe.


In case you think Sticky Toffee Pudding is,
as the name implies, a pudding like we know in America,
well, you're wrong.

"Pudding" is a term that just means dessert.

For example,
the classic Christmas "figgy pudding" 
that we all blindly reference in carols & plays
 is not a gelatinous clumpy mess, but a cake.

I know, it's confusing...
but don't worry about it.

Back to the matter at hand:

The cake is just perfect,
the caramel pool it sits in is just right...
and the clotted cream ice cream on top
makes the whole experience heavenly.

If you're searching for a serving of this famous cake
on your trip the England,
don't go anywhere else
other than Notting Hill.

And don't even think about sharing-
you'll be starting a war
that even Napolean would have avoided.


* * *


80 Chepstow Road
London W2 5BE

020 7313 9491


*image original to Aspiring Kennedy

Eat Your Heart Out (London): Central & Co.


The other day after Regent Tweet
with Megan, Amber, & Sophie,
I met up with Tyler & my friend Kyla
for a quick coffee to recharge.

{Quick recap of Regent Tweet below. Read more about it on Sophie's blog.}


from left to right: my huge hair | me | amber | megan | sophie


We had met up outside of Liberty
(tucked right off Regent Street at Oxford Circus) 
and decided to check out a new place
that had recently popped on my radar, 


It's awesome decor had lured me in 
on my way home the week before...
I then added it to my "eat here ASAP" list.

After getting a seat
and making ourselves comfortable,
that "coffee" soon turned into lunch & dessert.

If you're shopping on Oxford or Regent Street,
this place gets two thumbs up for me.


And if/when you go,
do not skip the Eton Mess.


Worth every calorie
in that gorgeous little cup.


Okay, that's it.

Keep Central & Co. on your mental list
for the next time you're in London.

{You can also PIN it or come find it in my London guide when you're ready.}


*all images original to Aspiring Kennedy

The Lovely Drawer: Not The Dowager's Victoria Sponge Cake


What Victoria was to Albert,
so Victoria Sponge cake is to a cup of tea.

Until I moved to the United Kingdom,
I had never heard of or tasted this classic treat.

For all of the Americans out there
who, like me, may not have grown up 
with this on the table at tea time,
I'll walk you through the basics.

Two sponge cakes 
+ one layer of whipped cream 
+ one layer of strawberry jam 
_______________________

Classic Victoria Sponge Cake

When my friend Teri of The Lovely Drawer
(you know, the one who did that killer Chorizo Stew recipe?)
mentioned she didn't like cream
(as in cream, whipped cream & ice cream)
I slapped her in the face.

Fine.

Not really.

But I was really sad.

Fortunately, she offered a peace offering
in saying that she accepted marscapone cheese.

Which, obviously, is the next best thing.

{Or maybe the best thing. Not sure how to rank the dairy family. They're all winners!}

And when she made me this cake
for dessert after dinner at their house one night,
I not only forgave her 
for shunning my camarades in the dairy section,
but I vowed to never settle for regular Victoria Sponge again.

{Which means, I'll also need to start crafting up a lot of reasons to invite myself over to her house.}


Here's how you can make one
with instructions from Teri, herself.

(This reads better if you read this in an English accent.)

***


So.....Victoria Sponge with a twist. Not so typically British but far superior, I think. I've been of the opinion that this classic can so easily be dry and boring but replacing the cream with mascarpone icing and the changing up the jam to raspberry gives it a whole appeal. My friend made me this cake originally and I totally had to eat my Victoria sponge-dissing words, along with my huge slice of cake. 

Here's the recipe...

Ingredients; 
225g self raising flour
225g butter (softened)
225g caster sugar (US read: normal)
4 eggs
2 teaspoons 
vanilla extract


For the filling;
Raspberry jam
250g mascarpone cheese
2 heaped tablespoons icing sugar plus extra for dusting (US read: powdered sugar)
2 teaspoons vanilla extract. 
A punnet of raspberries to decorate (US read: little plastic basket of raspberries)

Method:
Whip together butter and caster sugar until pale and fluffy
Then add vanilla extract and one egg and beat again. 
Add each remaining egg with 1 tablespoon of your flour and beat thoroughly after each addition. 

Once mixed, fold in the remaining flour with a spatula until combined. 

Pour mixture into a lined 20cm cake tin and put into the oven. 


Bake at 150 C degrees (US read: 325F) for about 45 mins or until golden and a knife comes out clean when inserted into the middle. Leave the cake to cool slightly and remove from tin to cool completely. 

Once cold, cut horizontally in two to put your filling in. Spread the top half with as much jam as you want.
Mix all the mascarpone, icing sugar and vanilla in a bowl until fully mixed and spreadable. Spread this mix on your bottom half and put the two halves back together. 

Dust the top of the cake with plenty of icing sugar and then arrange raspberries on top of the cake. 
Lightly dust some more icing sugar on top of the raspberries.


Who's mad about that?

Now, go...
make this immediately!

Or at least pin it for later
and let me know
so I can stop by accordingly.

(Also, check out Teri's SUPER CUTE blog. You'll be impressed.)


*all images from The Lovely Drawer

A Little Introduction: Les Profiteroles


Do you know what profiteroles are?

It's okay if the answer is "no."

I have to say, I dind't know what they were for too many years.

{It's a shame I bare daily.}

In case you are in the dark, like I once was,
let me do you a quick favor 
and introduce you to your new favorite dessert.

I'll do my best to paint a picture of what awaits you
the next time you see "les profiteroles" on a menu.

Start with the basic construction of a cream puff.

Imagine the small, orbs of slightly-chewy pastry puffs
filled with cream inside it's cavernous center.

Now, subtract the cream.

Add really cold, vanilla ice cream to where it once was.

Then, pour warm dark chocolate over the top.

Quite a lot of it, actually.

Sometimes, you'll have the addition of roasted almond slices to sprinkle on top.

Once you have all the components in place,
grab a spoon
and get to work.

You don't have much time to waste
once that ice cream starts warming up.

For all you visual learners,
here is a quick tutorial.


These particularly delicious profiteroles were from Cafe Constant,
a really delicious restaurant near the Eiffel Tower in Paris.

If you'd like to eat here
{which I highly recommend!},
be there when the doors open for dinner at 7pm.

If you are just 5 minutes late,
you could find yourself standing at the bar
for up to 2 hours waiting for a table...
which means you'll have to watch all the restaurant eat their profiteroles first.


*All images original to Aspiring Kennedy. Please source accordingly.


Related Posts Plugin for WordPress, Blogger...