



Showing posts with label delicious dish. Show all posts

The Lovely Drawer: Gingerbread Blondies


I love brownies like every other person,
but a blondie has certain mystical appeal to me.

I'm not sure why, 
but if I have the choice-
I almost always will defect from the chocolatey hero
and cling starry-eyed to it's paler counterpart.

You can imagine my wonderment 
when Teri whipped up these 
gingerbread blondies
in her kitchen
for this month's recipe.

Gingerbread yumminess
combined with a blondie
drizzled with white chocolate?

My mind was as blown 
as the first time I encountered
which my sister hilariously refers to as
"the Tur-Duck-En of desserts."

It's just one of those creations
you encounter that has 
so much goodness 
wrapped up in one tiny thing.

It's like, as the Brits say,
all my Christmases have come at once.

Here's Teri to walk you through
this lovely creation.

(Don't forget to read it to yourself
in a sweet English accent... it makes it so much better.)


*    *    *


These yummies may look like brownies but they are in fact gingerbread blondies and each gooey bite is worth every calorie. These are really straightforward to whip up and make a nice change to a standard brownie. They work well as a dessert with some vanilla ice cream or as an afternoon treat with a cup of tea or coffee, yum!


225g dark brown soft sugar
150g butter
4 tbsp black treacle
2 tsp ground ginger
2 eggs
2 tsp vanilla extract
125g plain flour
125g wholemeal flour
1 tsp baking powder
1/4 tsp bicarbonate of soda
1 tsp salt
100g gingernut biscuits
150g white chocolate


METHOD:

1. Preheat the oven to 180 and line or grease a 20x 20 baking tin.

2. Mash the dark brown soft sugar, butter and treacle together in a bowl with a spoon until the mixture is totally combined. Mix in the ginger, eggs and vanilla extract.

3. In a separate bowl, combine the plain flour, wholemeal flour, baking flour, baking powder, bicarbonate of soda and salt. Add the flour gradually, incorporating between each addition.


4. Break the gingernut biscuits and 100g of the white chocolate into small chunks and stir into the blondie mixture.

5. Pour the mixture into the prepared tin and bake in the oven for 25 minutes. Leave to cool. 

6. Melt the remaining white chocolate in a heatproof bowl over a simmering saucepan of water, stirring constantly.

7. Pour the chocolate into a bottle with a small nozzle or wrap a sheet of greaseproof paper into a cone shape and snip the end off to drizzle the white chocolate over the blondies. Leave the chocolate to set a little and then cut into squares.


*    *    *


Yum.

Teri is off to Brussels for a week,
and I'm hoping the sticky and sugar waffles 
provide some inspiration for her next recipe!

Check out her (amazing) blog,


Maui, Hawaii: Mama's Fish House


I probably had 30 people tell me to eat 
when we annoucned we were going to Maui.

So, we did
after spending the afternoon
in the cute little town of Paia.

And it was amazing.

Now, I'm adding to the chorus
of people singing this place's praises.


Please, go if you are in Maui.

It's just such a special place.

All the Hawaiin kitsch you could imagine
and yet, the seriously best fish
you've ever had in your life.

I had the Panang Curry.
Tyler got the mahimahi stuffed with crab and lobster.

Mmmm...

Oh, and the dessert is really good, too.

Try the banana & macadamia nut crisp
with tahitian vanilla ice cream.

Ohmygosh.

So good.


And the beach outside... 

It's so gorgeous.


PS. If you're imagining a small shack
with mama cooking you her special recipe,
you would be wrong.

This is an expensive dinner in a nice setting.


In fact, I was totally blown away with how big and nice
the restaurant is considering it's location.

Dress cute and plan to spend some cash.

It's worth it though.

(You know I wouldn't steer you wrong.)


*   *   *


Mama's Fish House
799 Poho Place
Paia, Hawaii 96779


*all images original to Aspiring Kennedy

My Notting Hill: Talkhouse Coffee


Our friend Reuben is generally very nice...

except when it comes to coffee.

You should have seen the snarl I got when I asked if 
he had served instant coffee after we had dinner  at their house one night.

The death look was given and noted.

So when he says that a place by our flat has really good coffee,
we listen.

Well, actually, Tyler listens
and then takes me....
and then I remember that this was the place
 that Reuben was talking up so much.


Talkhouse sits on Portobello Road,
at the end of the market.

It's a small coffee shop
that discreetly boasts
that it's barista won 3rd in the 
World Latte Art Competition.

(Who knew such existed, right?)


But not only does Talkhouse serve coffee so fancy
that it could make a hipster feel insecure
but the food is top notch.

We reallllly love the St. John's custard donut
and the chocolate chip cookie sprinkled with sea salt.

Yum.


The lunch options are also really good quality
and amazingly fresh.


If it's nice outside,
snag a seat in the outdoor garden area
at the wayyyyy back of the shop.

(Just keep going, it's there. I promise.)


Enjoy this good, good place.
I know you won't be disappointed.


275 Portobello Road
London W11 1LR


*photos by Noah Darnell


The Lovely Drawer: Pad Thai


When we moved to Oxford,
I fell in love with Thai food.

I'll be honest:
before we moved over,
I don't think I have ever had it.

Why? What? 

Why was I wasting so much of my life?

These are all valid questions.

And to be honest:
I can't give you a good reason. 

I guess it just hadn't made it to Tejas yet.

But oh me-oh-my... 
I fell hard for some Pad Kee Mao
(from Oxford's Old Tom Thai),
and now Thai takeout
is a weekly happening in our home.

The great news is-
there is an Asian supermarket
about 100 yards from our flat.

So now, I just need to put this recipe into use
and save the cash from our takeout bill
for something special.

Who knows...
it could be save up for a vacation to Thailand
when I can go to town on some authentic deliciousness.

Welcome back, Teri,
and thanks for bringing this amazing dish our way.

Yum.

*        *        *


Surely everyone likes Pad Thai? Well perhaps if you have a peanut allergy it's not top of your 'to make' list but it's a winner none the less. This recipe is a mixture of handy tips from my neighbour who recently cooked us this yummy dinner and a bit of good old experimentation. Now it's something I'll cook time and time again. 

You can equally enjoy this meal with chicken instead. I know some people get creeped out by seafood. (Personally, I could eat my body weight in the stuff!)


HOMEMADE ZINGY PAD THAI 
(serves four)


1. Make a marinade for the prawns using the chilli flakes, one garlic clove (minced) and half the coriander (read: cilantro). Marinade for at least an hour but ideally over night.

2. Thinly slice your onion and fry on a medium heat with some vegetable oil in a pan. Mince the other two garlic cloves into the plan and then add the bean sprouts.

3. Meanwhile bring a pot of water to the boil and add your noodles to cook. 

4. Mix the juice of 2 and half of the limes, sugar and fish sauce and chilli sauce in a bowl or jug. Mix well and add to the frying pan.

5. Turn down to a low heat and add your peanut butter, stirring to combine. Then add your prawns and marinade and cook.


6. Once your noodles are cooked, before draining, transfer a ladle's worth into the pad thai pan to give the sauce creaminess. You can add more depending on the consistency you like.

7. Add the noodles to the pad thai pan as well and combine on a low heat. 

8. Pour your peanuts into a blender and pulse until they become small pieces. When your prawns are pink, serve your pad thai with the peanuts sprinkled on top, the rest of your coriander (chopped) and a wedge of lime to squeeze on each.

9. Now you can devour it all! 


*      *     * 


Oh my yum.

Who's having me over for Pad Thai?

Please?

. . .

Get a bigger dose of Teri's creativity & aesthetic at The Lovely Drawer.


*images original to Aspiring Kennedy

My Notting Hill: Honest Burgers


I'm not really a meat eater.

Most of the time,
I stick to veggies...
unless it's exceptionally delicious meat.

Like boeuf bourgignon at a favorite French restaurant
or pork barbecue sandwiches when I'm in the South...
or Chick-fil-A nuggets by the handful because they are goooood.

We don't really eat at ton of red meat,
so we save our burger splurges
for the best...
which means we don't eat them in England.

Burgers in England are gross.

I hate to be a downer, but it's just true.

They're nasty (in my Texan snob opinion)
for two reasons:

1. The cows are grass-fed and it makes the beef taste weird.

2. They use breadcrumbs in the patties so it makes them have
a weird, meatloaf-y consistency.

Now, a year ago,
I could have written off this entire
soggy island and it's soggy burger patties...
but I actually, have to allow for a few exceptions.

Now that the US darlings Shack Shake & Five Guys 
have come to town,
it is possible to get a good burger...

AND because Honest Burgers is here.

Since they are British and have created a good burger,
they get an extra gold star.


There are a few locations,
but we go to the one in Notting Hill
on Portobello Road
(duh).

They offer a really simple menu,
but it's a good one.

Go with the Honest burger (bacon, cheddar, carmelised onion relish)
 + homemade fries with rosemary salt.


Once your tummy starts protruding
with a burger pooch,
you'll singing John Cougar Mellancamp
and swearing to yourself that you were
back in the good ole US of A.

(Except you actually won't be... so don't sing... Just hum.)


*      *     *


189 Portobello Road 
London W11 2ED

+44 (0) 7229 4978

(Other locations available here.)


*photography by Noah Darnell


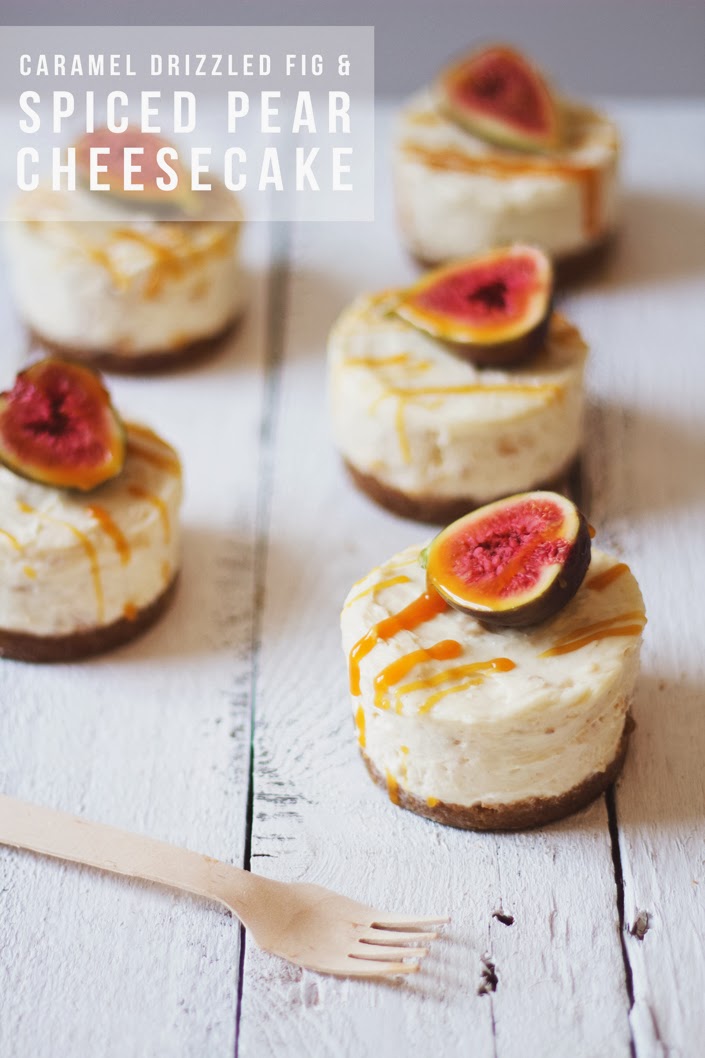
The Lovely Drawer: Spiced Pear Cheesecakes


So the holidays are over.

Womp. Womp.

Unless you are planning (re: neglecting) your Christmas tree
until it's a dry skeleton of what it once was
and hanging Valentines Day cards from it
like we run a high risk of doing...

January is a bit of dry spell of celebrating.

So... 
here's a little party you can throw for yourself:

these cheesecakes.

We went to dinner at Teri & Nick's the other week
and she made these for us as "pudding" (re: dessert).

With it's pretty figs setting on top for decoration,
I jokingly referred to is as a Figgy Pudding...
and I, of course, also flipped out
because it was delicious.

* * *


Any cheesecakes is usually a winner but I have to say I spend a lot more time making baked cheesecakes than set ones. In my head I'd somehow resolved that they were far superior. But then again the appeal of a dessert that doesn't actually even need cooking is quite tempting, especially when it involves mascarpone! 


I adapted this cheesecake recipe to form a spiced, winter version which would almost be warming...if it was so...chilled. I used a 3x1.75 inch mini cheesecake pan with removable bases. You could even smaller versions and make more or use 9 inch springform/ loose-bottomed tin for a standard cheesecake. My tin equated to 7 mini cheesecakes. Mini desserts are my fave! 


Cheesecake

1 C crumbled spiced biscuits, like Lotus (read: Speculoos) biscuits or similar.
1 oz walnuts 5 tablespoons unsalted butter2 pearsfigs for decoration2 tsp cinnamon 1/2 tsp nutmegtbsp firmly packed brown sugar14 oz full-fat cream cheese, at room temperature11 oz mascarpone, at room temperature3/4 C icing sugar, sifted1 tsp vanilla extract2 1/4 C water


1. Put the biscuits and walnuts in a bag and crush with a rolling pin until fine or blend in a food processor. Add 1 tsp of the cinnamon.

2. Melt the butter in a saucepan and then take off the heat stir in the biscuit and nut mix.


3. Press the mixture into each mini cheesecake tin. Compact well with your fingers or the bottom of a spoon and leave in the fridge while you prepare the rest. 

4. Peel and cut the pears into small chunks. Heat the water in a saucepan and add the sugar and the other tsp of cinnamon. Stir in and allow to dissolve. Add the pears and cook covered for about 15 mins. Allow to cool.

5. Combine the cream cheese and mascarpone in a mixing bowl and use handheld electric mixer to blend the cheeses together until light and fluffy.

6. Add the icing sugar a little at a time to incorporate and then add the vanilla to the mixture.

7. Make sure the pear mixture is cool and then squeeze the excess liquid out, gently through a sieve. Stir into the cheese mixture.

8. Spread this over your biscuit bases. Fill each mini tin and smooth over the top with a knife or spatula. 

9.Chill in the fridge for at least a few hours, ideally over night. The cheesecake firms up best when you remover them from their tins a few hours before serving and leave them in the fridge until you are ready to eat. Cut your figs into quarters and place on the top of each cheesecake.


Caramel sauce1 1/4 C powdered sugar
5 ounces double cream (or heavy whipping cream)
3.5 tablespoons butter


1. Transfer the sugar into a heavy based frying pan, stir in 4tbsp water and then place over a medium heat until the sugar is dissolved.
2. Turn up the heat and bubble for 4-5 mins until it forms caramel.
3. Remove from the heat and carefully stir in the cream and butter. Leave the sauce to cool and then transfer into a squeezy bottle.
4. Drizzle over your cheesecakes.


* * *


So, there you have it.

2014 just got a lot more awesome.


Check out more of Teri's cool creations
on her prettier-than-mine blog, The Lovely Drawer.


*all images original to Aspiring Kennedy

The Lovely Drawer: Maple Carrot, Apple & Bacon Soup


In the spirit of holiday fun,
I ate at least half of a pie over the weekend.

Maybe more, if I think about it,
but I don't really want to.

It's not like I regret it,
but... okay, fine,
I kinda do.

Woof.

I'm trying to do some meal planning 
for the week ahead
and making it a bit.... lighter.

I'm envisioning making a slew of salads
and meals involving ingredients 
that would make my Southern mom say, "Ew."

(Hey, Quinoa & Flax!)

And also, this:
Maple Carrot, Apple & Bacon Soup.

Yum.

Doesn't that sound
perfectly cozy and perfect
for a December night in.

Plus, soups are typically pretty economical
which means a few more greenbacks can go 
towards the Christmas shopping.

On to Teri for the recipe...
best read in a British accent.


*    *    *


I don't deal too well with the cold. 

Winter is in many ways lovely 
but I pretty much cart a hot water bottle around with me 
and gravitate towards radiators where possible...

Oh yes and I will probably have soup on the brain! 

If you share this feeling then here's a winter warmer 
to melt away the chills in your boots. 

It was a little bit of an experiment but it worked out well. 

I really enjoyed the sweetness of the maple syrup and apple 
against the saltiness of the bacon. 

It's like a hug in a bowl and is very straightforward. 
That's the great thing about soup! 


You'll need:

1.2kg/2.5lb carrots
3 apples (Braeburn, if available)
2 small sweet potatoes
1 large onion
Handful of rosemary
90ml/3.5oz maple syrup
drizzle olive oil
250g/9oz smoked bacon
3 large garlic cloves
vegetable stock
1 tbsp mixed herbs
1 tbsp paprika
drizzle of balsamic vinegar


Makes 6-8 portions


How to:
1) Preheat the oven to 200 C

2) Peel and chop the carrots,apples and sweet potatoes. Cut and chop the onion.

3) Line a baking tray. Spread the veg out over the tray. Crush the two of the garlic on top, season and sprinkle a bit of the rosemary over the top. Drizzle the syrup and the olive oil over the top and rub it in with your fingers, mixing the garlic in too. 

4) Cook for about an hour or until everything is well roasted, stirring every now and again to cook evenly.


5) Then transfer to a large saucepan and then pour in vegetable stock, season and add the rest of the rosemary. Add the vegetable stock until all the veg is well covered and bring to the boil. Then put a lid on the saucepan simmer for about 20 mins. Add extra stock or water if you want a thinner consistency.

6) Meanwhile heat a drizzle of oil in a pan and fry the bacon, along with the remaining garlic clove (crushed). Drizzle balsamic over the bacon halfway through frying. Once cooked add to the soup, saving a little for garnish.

7) Then blend the whole lot with a hand blender until smooth. Once again if it looks too thick you can always add some water. 

8) Serve hot with a sprinkling of bacon, a sprig of rosemary and your favourite winter blanket.


*     *    *

You can get a full helping
of Teri's cuteness & unstoppable creativity
over on her blog, The Lovely Drawer.


*images original to Aspiring Kennedy

The Lovely Drawer: Pumpkin, Pancetta & Sage Lasagna.


Pumpkin, Pancetta & Sage Lasagna?

I'm just going to stop talking now
and let Teri do her thing 
as she is obviously on a hot streak
with this amazing recipe.

Now she can do the talking (yes, in her fab-o British accent),
and I'll let you do the pinning/planning/reservation canceling
so that you can get this recipe 
added to tonight's dinner plans.

YUM.

One more thing: 
I think it's cute how Brits say "lasagne" instead of "lasagna."
Lasagne actually the correct way, oops!

Okay, I really am done talking now.

*  *  *


Pumpkin, Pancetta & Sage Lasagne


It's come to that time of year when I'm compulsively pinning pumpkin recipes as though my life depends on it and daydreaming about the smell of roasting squash wafting through my flat. All things considered, it seemed fitting to dig out this tasty dish. 

It's a healthier version of the creamy, oozy lasagne we are all so familiar with. Now let me clarify, this isn't going to win you lots of diet points but it is 'better' for you than most. Seeing as my tummy can't handle lots of creaminess and I'm no fan of mince (read: ground beef), I've ended up with this hodge podge of ingredients which I would say is actually (in my humble opinion) more flavoursome than the old classic. 

Plus my husband liked it so much he had the leftovers for breakfast and lunch the next day. I'm not advocating that, but it is impressive! 


To make:

1. Chop up your onion and dice your pancetta (depending on how you've bought it) and start to fry them in a pan along with the crushed garlic. Add the sundried tomatoes, most of your sage (chopped), paprika and mixed herbs. Season with salt and pepper.

2. Once cooked stir in the passata sauce and simmer for 5 mins. Set aside.

3. In another pan wilt your spinach and season lightly. When cooked drain the tin of spinach and add to the pan to bulk up the greens.

4. In a bowl, mix the pumpkin with the nutmeg until combined and set aside.

5. Crack and whisk the egg and then in another bowl, beat the egg and ricotta together.


6. Lightly grease your baking dish and then start layering up the lasagne, making sure each layer is spread right to the edge. Place two pasta sheets on the bottom (side by side, overlapping if they don't fit), followed by a layer of spinach, followed by a layer of pumpkin, followed by another two pasta sheets (side by side), followed by the tomato and pancetta mixture, followed by another two pasta sheets (side by side) followed by the ricotta mixture on top. Make sure the pasta is covered right to the edges. Finish by sprinkling the chedder cheese over the whole thing and scatter the remaining sage. 

8) Cook on 190ÂșC for 25 mins and then place a sheet of baking paper or foil over the top and cook for a further 15 mins and then serve. It tastes really good with a balsamic and rocket (read: arugula) salad.


*   *  *

Isn't she the cutest?
I know you'd love hanging out with her.

She's pretty awesome.

Check out more of Teri's creative side
on her pretty blog, The Lovely Drawer.

Related Posts Plugin for WordPress, Blogger...